Tone Monster Pickups Selection with Lead/Rhtyhm Switch |
 |
 |
| NOTE: This switch location may require minor routing of the body under the pickguard. |
NOTE: This switch location will almost certainly require routing under the pickguard.
Check clearance to edge of pickguard! |
| These modifications DO alter the appearance of your guitar. |
Switches above show:
Neck = rhythm (parallel), Middle = lead (series),
Bridge = lead (series), Lead/Rhythm = lead (series).
Center pot is rhythm (parallel) tone, lower-right pot is lead (series) tone. |
This modification creates two separate "channels" in your guitar; one for "rhythm" with the pickups wired in parallel, and the other for "lead" with the pickups wired in series. Each "channel" has its own tone control and there is a single master volume. A single switch selects either the "rhythm channel" or the "lead channel." Three other switches assign each pickup to either of the "channels."
Note that when you select the "rhythm channel" those pickups assigned to the "lead channel" are effectively turned off -- and vice versa.
With this circuit you can flip one switch to go from having the neck pickup with a tone control for rhythm to using the bridge and middle in series (usually much "hotter" than in parallel) with their own tone control for lead. Or, you could have the neck and middle in parallel for rhythm and the bridge alone for lead. Or any other combination you can think of.
 |
 |
 |
 |
Update - 10 January, 2004
Switch 4 (the "lead/rhythm" or series/parallel switch) is only a two pole switch.
Therefore, you could use a DPDT push/pull pot (on volume or tone) for this switch and thus
avoid worrying about where to locate the fourth switch without routing the body cavity or
getting too close to the edge of the pickguard.
|  |
 |
 |
 |
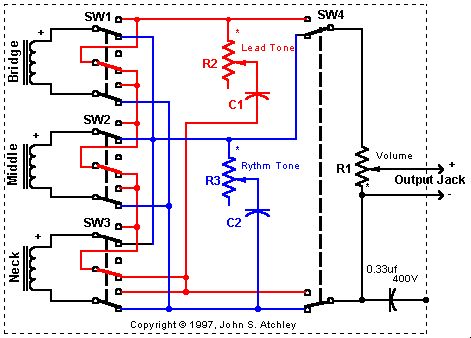 |
| "ToneMonster" Schematic |
|---|
Lead (series) circuit is in red.
Rhythm (parallel) circuit is in blue.
Circuitry switched between the two "channels" is in black. |
| SW1-SW3 and SW4 are all shown in parallel or "rhythm" position. |
C1 = 0.01uf with 250k pot, 0.02uf with 500k pot.
C2 = 0.02uf with 250k pot, 0.033uf with 500k pot.
You can try other capacitor values to suite your tastes. |
Parts Required:
- Three 3PDT subminiature toggle switches (on-none-on). These are available from Allied Electronics, Allied Stock Number 757-3423 (cat # 956) for $9.22 each -- look around though, there has got to be a cheaper source!
- One DPDT subminiature toggle switch (on-none-on). Allied Stock Number 757-9883.
- Two film capacitors (0.01uf & 0.02uf with 250k pots, 0.02uf & 0.033uf with 500k pots)
Existing Parts Removed:
- Pickup select switch
- Original tone capacitor
Building this is fairly straightforward, though there are quite a few wires to be soldered on tiny switch terminals. It is most important that you accurately measure the position of the switches before you drill the holes to mount them in -- especially if you use the configuration shown in the right hand picture at the top of this page because that puts the switch quite close to the edge of the pickguard. If you use the configuration shown on the left at the top of the page, you might be able to squeeze all four switches into the cavity where the stock switch was. If not, a little routing or carving of the body under the pickguard will be needed. You will almost certainly have to do a bit of routing for the configuration shown in the right hand figure and you need to be very careful not to route the body too far out where the pickguard won't cover the cavity!
|
