Quieting the Beast's Cousin, Shielding a Tele™
This modification does not alter the appearance of your guitar.
What people have said after shielding their guitars.

Introduction
Most guitars with single-coil pickups suffer to some degree from hum. From the factory most Telecaster™ guitars do not hum as badly as most Stratocaster™ guitars. This is because the standard Tele™ has a metal cover on the neck pickup and a massive metal plate surrounding the bridge pickup. Still, many Teles can benefit from shielding. If you have or are planning to remove the metal cover from the neck pickup then the guitar will almost certainly benefit from shielding. Also, shielding will reduce susceptibility to radio signals and the like.
Shielding a Tele is much easier than shielding and star-grounding a Strat. The Tele can be shielded without desoldering a single connection (though you will need to solder one new wire in place). Rewiring is not usually necessary with a Tele because the factory wiring usually does not contain ground loops as most Strats do. We don't use the bridge/string isolation capacitor on a Tele either because there simply isn't room for one in most Teles. Keep that in mind if you are planning to use the guitar with vintage equipment or in venues with questionable wiring. This modification does not provide the slight safety factor that the instructions for shielding a Stratocaster do. See the safety article on shock hazards facing the guitarist for more information.
Shielding and regrounding your guitar will not signficantly alter its tone, other than that it may sound a bit more alive because faint harmonics that were buried in hum can be heard more clearly when the hum is removed. Also, you will typically be able to play at higher gain levels before hum becomes objectionable. This means more tube saturation and sustaining feedback. These instructions have been online at various URLs since early in 1996. During that time I have never received an e-mail from anyone who wanted to know how to put the hum back into their shielded guitar!
Probably the greatest benefit of reducing hum is the accompanying increase in sustain and dynamic range. As you reduce hum you can crank the gain higher on your amplifier before the hum becomes intrusive. With the increased gain you get better sustain and you can vary your picking attack for much better dynamics as you play.
I think many guitarists have become so accustomed to hum that they've fallen into the habit of adjusting amplifier volume to the point just below where hum becomes annoying. I've heard from a few people who reported that there wasn't much reduction in hum after shielding. Occasionally we find that they missed something in the instructions. Less frequently we find that they had really hot overwound pickups and/or pickups mounted high in the pickguard (i.e. for a guitar with high action) and in these cases directly shielding the pickups solved the problem. Still less frequently we find that they had shielded one of the rare guitars that was pretty well shielded at the factory so there wasn't much noise to begin with (in the last few years more and more guitars are recieving at least a shot of shielding paint by the manufacturers but even this is still far too rare). But, almost all of those few who initially report little reduction in hum say things like, "my guitar sounds much better now and sustains better but it still hums about as much as before." Most have had the good grace to feel a bit sheepish when I point out that it sounds better and sustains better because they are playing at much higher gain levels – and that they can play at those higher gain levels because of the reduction in hum!
Skills Needed
You will have to do a small amount of soldering. You will need to solder individual pieces of copper shielding tape together after they've been installed and you will have to solder one small piece of wire that runs between the shielding in the control cavity and the shielding in the neck cavity. If you've never soldered I recommend that you get a pamphlet on the subject and practice on scraps of wire and such before working on your axe. You also need the ability to follow written instructions and the patience not to rush through the modification haphazardly. Beyond that, if you've learned to play guitar then you should have the manual dexterity to follow these instructions. I suggest that you print this page, read it through several times, and then check off each step as you complete it. (Note that these instructions assume a Telecaster guitar -- modify as needed for other types.)
Tools Needed
All of the following are available at Radio Shack stores. Many hardware stores will also carry these tools and possibly at better prices.
- Soldering iron. An inexpensive 30-watt pencil will work but, for this particular job, a "gun" is more convenient.
- Wire cutters and strippers.
- Sharp hobby knife or single-edge razor blades.
- Screwdrivers that fit the pickup mounting screws and pickguard and control plate mounting screws.
Materials Needed
- Resin-core electrical solder and paste or cream electrical soldering flux.
- A few inches of 20 or 22 guage wire.
- Heavy duty aluminum foil (the grocery store variety is fine). One reader reports he found a suitable copper foil at a craft store (Michael's) for about $8.00.
- Craft spray trim adhesive. I usually use 3M but one reader reports that he got great results using Elmer's Spray Adhesive at about 1/3 the price of 3M.
- Conductive copper self-stick shielding tape. Available from Stewart MacDonald's as catalog #28 ($6.48 in winter 2000 catalog). One roll will easily shield four or five guitars.
These materials are available from any number of suppliers. Also, some suppliers are now making custom
items such as pre-cut shielding foil for pickguards and what have you. Bill Horner, a regular denizen of the forums,
has put together a pdf document listing some sources for these supplies.
Thanks Bill!
One Step at a Time
These instructions are much simpler than the Stratocaster instructions. Just look at the pretty pictures and read the notes!
As mentioned above, you do not need to disconnect any wires. I would recommend that you work on one cavity at a time – that way you don't have the bridge dangling around loose while you are working on the neck cavity and so on. The first thing to do is to remove the strings from your guitar.
The bridge pickup cavity. Let's do the bridge cavity first. After removing the strings from your guitar, remove the screws that hold the bridge to the body. Note that there are usually three small screws that hold the pickup to the bridge – leave those alone.
Lift the bridge straight up and move it to the side. Be careful not to pull too hard on the pickup wires. You may want to wrap the bridge assembly in a clean rag to prevent it from scratching the finish on your guitar.
Remove loose and built-up rubbing compound from the body cavity.
Shield the bridge cavity with copper tape as shown in photo one. This will take two or three pieces of tape (one flat in the bottom and one or two around the sides).
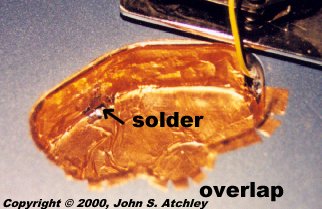
Photo one, shielding the bridge cavity.
Notice in photo one that we allow some of the tape to fold over onto the top of the guitar. This overlap will make contact with the bottom of the bridge plate, which is already grounded. That is why we do not need to attach a wire to this shielding. Do this overlap at the back of the cavity because there is very little clearance at the front and sides and we don't want the copper foil to show when the bridge is reinstalled.
Also notice in photo one that we solder all the pieces of tape together. This may not be necessary, depending on the type of tape you are using. Checking this with an ohmeter revealed that all of the tape was electrically common before I soldered the place where the three pieces met. Soldering just added insurance that they will remain electrically connected twenty years from now. Where you solder the joint isn't important – just make sure that all of the pieces of tape are soldered together.
The guitar in these photos was is a 1996 Fender standard (Mexico) Telecaster. This model did not have the strings going through the body. There may be minor differences in the shape of the cavity for other models. Use common sense.
Reinstall the bridge.
The neck pickup cavity. Remove the pickguard, then remove the neck pickup from the pickguard. First, we'll shield the back of the pickguard. This isn't essential unless you are using a pickup without a metal cover – but it's always a good idea. It only takes about ten minutes and shielding the back of the pickguard can help wick away the static buildup that sometimes causes popping noises while you are playing.
Lay the pickguard face down on clean newsprint or something else that you don't mind getting sticky. Spray a light coat of trim adhesive on the back of the pickguard. Follow the instructions on the label. Be careful to spray straight down so that you do not get adhesive on the front of the pickguard around the edges. When the adhesive becomes tacky, move the pickguard to another clean surface and lay a single piece of foil on the back of the pickguard. Working from the center outwards, press the foil against the adhesive. Carefully smooth out any bubbles or wrinkles.
Trim the foil from around the edges. You can either trim it right to the edge as described in the Stratocaster shielding instructions or you can trim it in about 1/16" as shown in photo two, below. If you trim it as shown in the photo, rub the adhesive off with your fingers so that the pickguard won't stick tightly to the body when the pickguard is reinstalled.
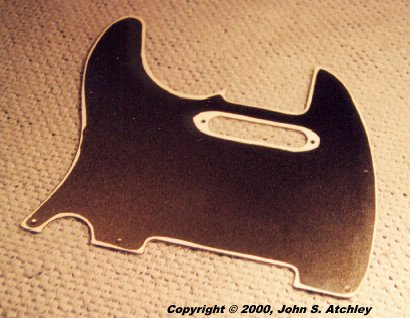
Photo two, shielding the pickguard with aluminum foil.
The only critical area is around the pickup slot and holes for the pickup screws. Here you want to make certain that you remove enough material that the metal cover on the pickup and metal springs on the pickup mounting screws don't contact the foil. The pickup cover is grounded and if it also contacts the foil on the back of the pickguard (which will be grounded through the cavity shielding) this will create a ground loop that is susceptible to noise. Exception – if you are doing the T-Riffic™ modification then leave the foil around the pickup mounting screw holes and trim as close to the edge of the pickup hole as possible.
Remove loose and built-up rubbing compound (white gunk) from the pickup cavity and wire channel.
Shield the pickup cavity and the wire channel that goes to the control cavity with copper tape, exactly as you did the bridge pickup cavity. Overlap onto the top of the body so that the shielding will make contact with the foil on the back of the pickguard. This section may take several pieces of tape. Again, solder all of the pieces of tape together. Run a short piece of wire through to the control cavity and solder one end to the foil in the pickup wire channel. See photo three, below.
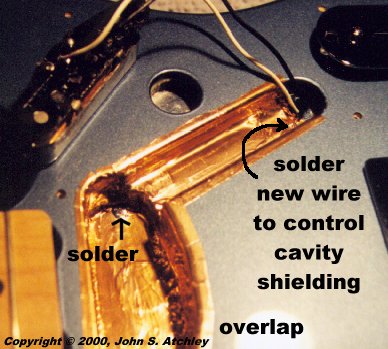
Photo three, shielding the neck pickup cavity.
Reinstall the pickup into the pickguard and the pickguard onto the guitar.
The control cavity. Do I really need to add any words here? Refer to photo number four, which shows the shielded control cavity. Note that this cavity is extremely oddly shaped and it may take several small pieces of tape to shield it. Some switches and pots fit pretty close to the edges and bottom so make sure you get the shielding tight and smooth so it won't ground out the circuitry. Notice the other end of the new wire (that runs to the neck cavity shielding) soldered to the shielding here. Make sure the wire lies flat along the bottom edge of the cavity, leaving room for the switch. At each end of the cavity we overlap the shielding onto the top of the guitar slightly at the screw holes. The shielding picks up it's ground connection from the control plate via this overlap. Don't overlap along the sides as the control plate barely covers the cavity.
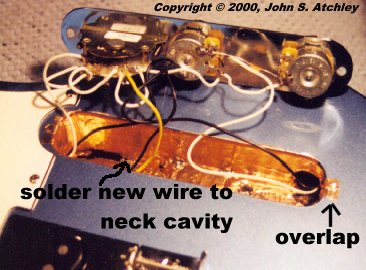
Photo four, shielding the control cavity.
My Guitar Still Hums!
No shielding is 100% effective if you're using single-coil pickups. Most people, however, find that following these instructions results in a significant improvement.
Don't overlook the fact that you may have subconsciously cranked up the gain on your amp! We guitarists love saturation and many of us have kind of become conditioned to turn up the gain until the hum becomes objectionable, then turn it back a smidgen.
Another thing to consider is that your amplifier and guitar cord may be contributing to the noise problem. Always plug the amp into a properly grounded power outlet and use a guitar cord with a tightly woven shield braid. Also, always use the shortest guitar cord that you can – if your style includes bouncin' and flouncin' all over the stage then you should spring for a wireless system!
If your guitar was already pretty quiet then the guitar and/or the pickup coils may have already been shielded. A few manufacturers are beginning to wise up and some late model guitars are pretty well shielded.
Finally, you may need to shield the pickup coils themselves with copper tape. This is especially true if you have hot "overwound" pickups or a very high action (so that the pickups are high in the pickguard), or if you want to play at "way huge" gain levels. Be advised, though, that wrapping the coils with copper will alter the tone – typically you will lose some of the high frequency bite (remember that many tele players remove the factory-equipped metal covers from their neck pickups). This is why I don't routinely recommend wrapping the coils even though it is by far the most effective shielding.
| 