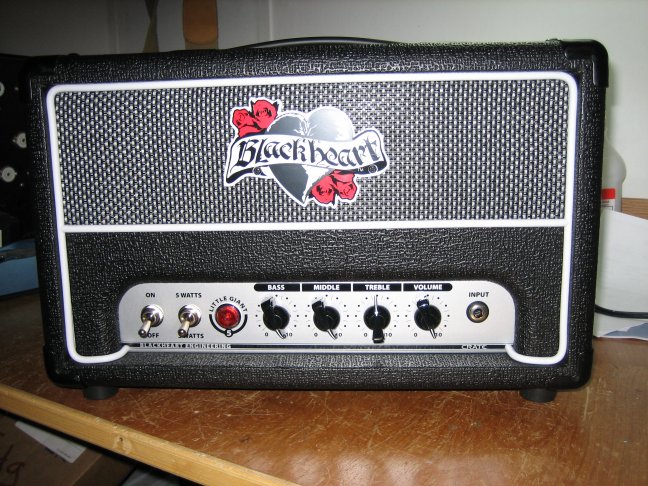
Review and Modification of the Blackheart™ Little Giant
5W Tube Head
3/22/2008
Last updated: 5/16/2008
|
The recent furor over the Blackheart Engineering "Little Giant" 5-watt tube guitar amp head has been nothing short of amazing. Online
retailers have literally been unable to keep them in stock. The first time I attempted to order a pair they went backordered between the
time when I placed my online order and when they processed my card. The second time I phoned in my order and got a pair on the way to me
the day before the last online retailer raised the price from $150 to $180.
The amp is similar to the Epiphone Valve Jr. (not surprising since it was designed by the same man, Pyotr Belov) but with several distinct improvements.
The plate supply in the Little Giant uses 47uf capacitors, twice the filtering of the Valve Jr. The Little Giant features DC voltage on the filaments,
a very necessary innovation not implemented in the Valve Jr. until about the third version. The difference most obvious from the exterior is the
complete TMB (Treble-Mid-Base) tone stack on the Little Giant. The transformers in the Little Giant also appear to be of better quality -
as we will see later, I don't believe there is any need to "upgrade" the iron at all.
Provided that you don't get a bad tube the amp is giggable right out of the box though I strongly recommend a couple of inexpensive, in one case even no-cost,
modifications as indicated below. Getting a bad tube is a very real possibility, though. The 12AX7 preamp tubes in both of the amps I received
were pretty microphonic - one was bad enough the amp was unplayable. I guess this shouldn't be too surprising, when you are going to market what is
really a very well-built amp for under $200 corners have to be cut somewhere and I suppose that Blackheart figures the tubes are most easily replaced by
the user. Besides which, many people upgrade the tubes in their amps anyway. I would seriously consider ordering a decent 12AX7 and EL84 at
the same time that you order the amp (assuming you don't have boxes of them laying around the house already, as some of us do).
This amp is really quite a killer, tone wise. Especially with good tubes, and even more so with a couple of inexpensive and very easy "tweaks."
Obviously, it's not a high-gain metal monster - you'll need pedals to go there. Fortunately, it likes pedals and can be tweaked to like them even
more. Probably the only thing the amp might not be suitable for is traditional ("old") country and clean jazz - it just doesn't have quite enough
clean headroom to get those jobs done. It does have more clean head room than other 5W SE amps I've used, though.

An Amp Company With a Sense of Humor
(Read the slogans at the top of each decal...)
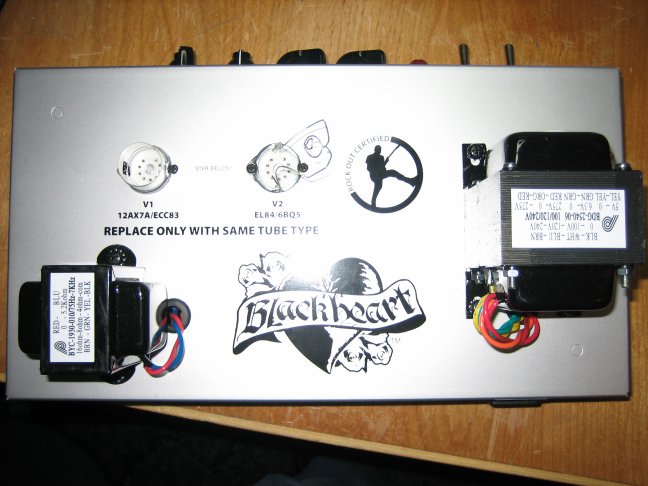
Chassis is Well Made and Nicely Finished - Iron Looks Good
Frankly, I am very surprised at both the sound quality and build quality of this little gem. It isn't perfect, but its deficiencies are easily
and inexpensively cured, making this a DIY'ers dream. Pyotr and company are very supportive of the hobby community, going so far as to making the
schematic readily available.
One thing that I consider a "design deficiency" is the rather skimpy 22uf bypass capacitor on the power-tube cathode resistor.
Calculating filter values makes it
seem like this is adequate. In reality a much larger value is needed to keep the bias from going colder during long bass-heavy passages.
Subsonics, tones that won't even be heard through the output transformer and speaker, can charge a small capacitor, driving the bias more negative.
Using a larger capacitor prevents this. Don't get me wrong, the amp sounds pretty darn good with the factory value, but if you do a lot of bass-heavy chugging
you'll be happier with 220uf to 330uf or even more.
Update 4/18/2008: I have found one other area of concern. Without a standby switch the filter capacitors are stressed
pretty hard for about fifteen seconds each time the amp is turned on. These caps are rated 450VDC and I've measured the no-load power supply at 400VDC.
This allows for only about 11% derating which is pretty slim in a tube amp. The .1uf poly cap in parallel with the last filter cap is not derated at
all as it is rated 400VDC (normal operating voltage at this point is only about 278 volts but turn-on voltage is close to 400 volts because there is very
little current flowing to drop voltage across the filter resistors). Even if these were mil-spec Sprague caps I'd be a bit concerned - with the
commercial Chinese caps I expect that
this is going to be a weak point in the amp over time. I've decided that
I will be converting the pentode/triode (5W/3W) switch to a standby switch on all of my Little Giants. While there is a distinct difference in both
volume and tone in the triode position, I've found that once the novelty wore off I stopped using that position because it leaves the tone a bit
lifeless. So, I will thank Pyotr and friends for pre-mounting a high-voltage switch that I can use as a standby switch. I
regard long-term reliability as far more important than the marginally useful triode mode.
 |
 |
 |
 |
A lot of folks ignore the standby switch even when their amp has one, or they think it's only for muting the amp between sets.
In reality, using
the standby switch properly can drastically prolong the life of some amplifiers. If your amp has a standby switch you should always have the amp in
standby when you turn it on and leave it in standby for about thirty seconds after turning the power on. Doing this withholds the high voltage from
the amp until the tube filaments have heated up. This is better for the tubes - though the effect there is very slight. The much more important
effect is that it ensures that high-voltage is not fed to the amp until the tubes are able to conduct current. This keeps the high voltage from rising
to "no-load" levels. In the case of the Little Giant, for example, the high voltage from the rectifier is 400VDC
under no-load conditions, but falls to 372 volts when loaded by the conducting tubes. At the preamp end of the filter chain, where the 400V .1uf poly
cap is located in the Little Giant, the difference is even more drastic - the unloaded voltage is almost 400V and the loaded voltage is only about 278
volts. Over time (years, usually) the stress of running near maximum ratings, even for short periods of time, takes its toll on the amp's components,
particularly filter and coupling capacitors. (This also illustrates why you don't want to run an amp with the power tubes unplugged except for short
periods of time when troubleshooting on the bench.)
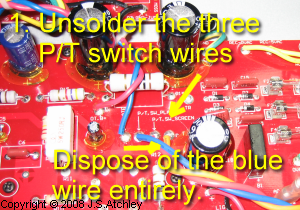
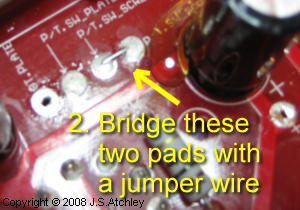
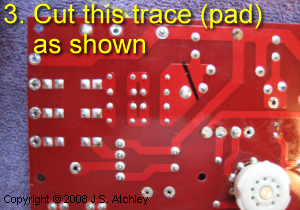
Update 5/16/2008 Converting the triode/pentode switch to a standby switch is fairly easy. The pictures below
illustrate the changes. It is necessary to cut one circuit trace (actually, a large pad) so this will certainly void your warranty!
Follow All Safety Precautions
Lethally High Voltages!
See Warning Below! |
 |
 |
 |
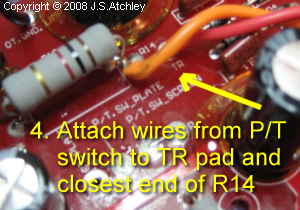 |
| In step three, make sure that the cut through the circuit pad is fairly wide (at least as wide as shown by the marker).
When the switch is in standby there is about 400 volts difference between the separated sections. |
|
 |
 |
 |
 |
The construction is marvelous for an amp in this price range. The construction is Chinese but nowhere near as obviously so as I've seen on many other
amps. In short, when I look in this amp I feel like it will probably still be working in five years - that's not the impression I get from some
Chinese made amps.
Updated 5-16-2008: Of the four Little Giants I now own one had several components that appeared to have cold solder joints. I
say "appeared" because on closer investigation it turned out that all of those suspect solder joints only looked bad on the component side of the board and
the connecting trace was on the other side of the board, where the solder was well-adhered to both the component lead and the board trace. It's still
annoying though and shows that Chinese quality control is pretty spotty even on these comparatively well-built amps.
There is one glaring deficiency in an otherwise very well assembled amp - the routing of the AC wiring. Out of the box both of
my amps had a serious amount of hum at full volume. The hum was bad enough that I could hear it from the next room even over the air conditioner (with
the volume fully up and the amp plugged into a very efficient 1 X 12 oversized cab).
That's the sort of thing that's not going to show up while you're actually playing but between songs it would definitely be noticeable. Fortunately,
this problem is very easy to fix.
The power is
very well filtered, and the 1V of ripple on the DC filaments was not the problem because the hum was 60hz while the filament supply uses a bridge rectifier
so the ripple is 120hz. I got out the scope and tracked the problem to the tone stack, especially around the 1 meg bass pot. I noticed that
two primary leads from the transformer were attached to spade lugs on the circuit board not far from the bass pot. The wires weren't actually in
use (there was no circuit trace on the spade lugs) - they were just being "parked" there. Another definition of an unterminated wire is "transmitting
antenna!" To add insult to injury, the primary wiring was not twisted and the excess wiring was bundled over the board. If you compare the two photos
below, after the warning, you will see the most important "modification" you can make to this amp! Twisting and relocating the AC leads took all
of five minutes and dropped the hum noise signal at the volume pot from 25mV to 7mV - that is almost a 400% reduction in noise! I consider this "modification"
absolutely essential. The good thing is it costs nothing, requires no tools (other than those used to remove the chassis from the cab), and shouldn't
even void the warranty.
 |
 |
CAUTION! Working on tube amplifiers can be extremely dangerous!
Do not attempt this project unless you have been trained to work safely with high voltages. This
project works with AC line voltages and with DC voltages approaching 350 volts - either of which is easily lethal!
Even if you do not get shocked an improperly
modified amplifier can cause a fire that burns down your home.
If it sounds like I'm trying to scare you it's because I am. This project is intended only for
those who are qualified to accomplish it safely. For the rest of you, the best amp in the world isn't worth
killing yourself over!
Use at your own risk!
These modifications will void the manufacturer's warranty. Should you choose to perform one or more of these
modifications you do so at your own risk. Neither the manufacturer of the amplifier, GuitarNuts, nor
John Atchley shall be liable for damages resulting directly or indirectly from these modifications or the attempt to accomplish them regardless
of whether or not the modification was performed completely in accordance with these notes.
If you are not certain that you understand exactly what is necessary after reading this article and the
accompanying pictures and schematic, that is a very good sign that you are not qualified to perform the
modification!
| |
|
 |
| Factory AC Wiring |
 |
"Dressed" AC Wiring
This small change alone reduced hum by almost 400%!
(Also note that when this photo was taken C2 and R5 were lifted so I could
trace the noise to its origin.) |
Note the extra brown and white wires from the power transformer primary were removed from the lugs on the circuit board, twisted together, and then routed
up the side of the chassis away from all components in the signal path. On the second amp I am going to simply clip those two unused wires off short
and insulate them. I don't have any intention of using the amp anywhere but the U.S. Update 5-16-2008:
On the third amp I also clipped the unused yellow wires and capped them. (These are the 5V
secondary that is not used unless you are going to take the silly step of installing a tube rectifier.) This amp is significantly quieter than
the other two (I haven't modified the fourth at all yet) but whether that is from clipping the unused wires, installing a different, OT, or just luck
of the draw I have no sure way to tell.
Modifications
The Blackheart is quite easy to work on, and lends itself to modification. The modifications I've done are listed below in what I consider
the order of importance. The photographs below illustrate each of the modifications. The cost of parts for all of the modifications combined
(except for the tube and output transformer replacement) is probably between ten and twenty dollars. I had the parts on hand so I don't know exactly what they cost. I do know that the cost of the
low-noise resistors went up significantly right after I stocked up on them for a couple of projects.
-
Rerouted the AC wiring to reduce hum by almost 400% (illustrated above). I regard this as absolutely essential. There is no change in tone other than the
reduction of irritating 60hz hum. No parts are required and, unlike other modifications listed here, this should not void your warranty.
-
Replaced the tubes. This won't void your warranty, of course, and the parts cost depends on what tubes you decide on. I used a JJ EL84 from Bob at
Eurotubes. I tried several preamp tubes from my stock before finally settling on a GT 12AX7 "M" (Mullard reissue). That is not necessarily a
final choice - just what was in the amp when I got tired of swapping tubes. I tried several NOS preamp tubes as well as JJs. Everything sounded
pretty good except for the microphonic Chinese tubes that were originally in the amp.
-
Replaced the power stage cathode bypass capacitor with a 330u, 50V electrolytic (see "A" in photos below). Be careful to observe polarity and to use hot glue to prevent the
capacitor from vibrating. This modification won't make an obvious difference in tone but will stiffen up the bass and make the amp resistant to
"going cold" when a lot of low-frequency material is present. You may notice a slight increase in bass response.
-
Replaced all resistors and capacitors of first gain stage with premium quality low-noise components (items marked "B" in photo below).
Noticeably decreases "hiss." Not essential
but probably a good idea if you intend to use the amp in the studio, especially if you also do the gain ("C") modification as that modification will tend to
increase noise a little.
-
Replaced the first stage 100k plate resistor with a 150k resistor for slightly greater gain and to bias the first stage a little warmer (see "C" in photo
below). This increases the gain at the first stage about twenty percent. More importantly, it biases the stage a little more warmly - this latter
effect will only be noticed if you are overdriving the stage using active pickups or a pedal. This modification falls into the "personal taste"
category rather than something that can be unequivocably categorized as an "improvement." I highly recommend doing the "B" mod if you do decide to
do this one (more gain here means more hiss so you want to minimize the hiss). Again, this modification won't get you much unless
you have a guitar with very weak pickups (so you need more overall gain) or you are using very strong active pickups or pedals and intentionally overdriving
the first stage. In fact, if you use a typical humbucker-equipped guitar this modification can drive the amp into blocking distortion (ugly) at full
volume. That's not really a problem since you can simply turn the volume down some but you do need to be aware of it.
-
Revoiced the amp to be more "British" by replacing the 22uf first gain stage cathode capacitor (C1) with a 0.68u poly film capacitor (see "D" in photo below).
Offset the bass
reduction by replacing the 1uf second stage bypass capacitor (C5) with a 22uf or 33uf capacitor (you can reuse the capacitor removed from C1 if you are
very, very careful removing it). Note that in the photo the capacitor is actually a 330u capacitor because that was all I had on hand and I destroyed
C1 while removing it. This modification is purely a matter of personal taste.
-
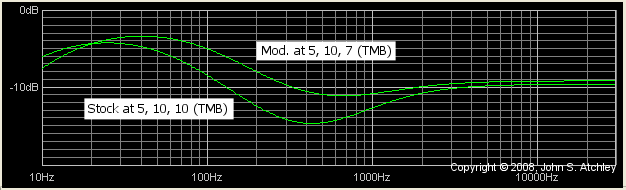
Replaced the 100k R5 with a more typical 33k resistor (see "E" in photo below). This gives more bass and low mids at the cost of some effectiveness
of the treble control. This is a matter of personal taste - I happen to like bass. (If you're doing screaming leads you may well like the
original contour better.) This picture shows the frequency response curve calculated (by Duncan's Tone Stack Calculator) for the tone settings that
sounded best to me for the modified and unmodified amp with my Bell Custom Guitars SG style guitar with Seymour Duncan "59" pickups. Note that the
calculator shows only the response of the tone stack while the "best" tone was judged listening to a stock unmodified amp and one that had all of the
modifications in this list.
-
Replaced the 470p disk treble capacitor (C2) with a 500V 500pf silver mica (see "F" in photo below). Probably totally unnecessary, but I have a bag
of these capacitors and I was already in the amp.
-
Added a .1u poly film cap across the 4700uf filament filter capacitor (C18) (see "G" in the photo below). I did this to reduce the chance that the
amp would radiate switching noise that might be picked up by a single-coil guitar in close proximity. This did very slightly reduce raspiness in the
ambient hum - but I wouldn't bother if I wasn't already in the amp doing something else.
-
Replaced the 33k grid stopper resistor R2 with a 10k resistor (shown only as part of the "B" mod on the photo). This causes a little less
high-frequency loss at the input of the amp. It's a non-essential mod (you probably won't even notice the difference if you're not using an octave up
or treble boost pedal) and I wouldn't bother unless you do it as part of the "B" mod as I did.
-
Added 5-16-2008: Converted the 5W / 3W switch to a standby switch. No effect on tone. This isn't a necessary
mod but may prolong the life of your amp (as in from a few years to decades). I intend to perform this modification on all four of my Little Giants.
See above.
-
Added 5-16-2008: Installed a Doberman / Heyboer 20-Watt SE output transformer. As mentioned in the original article I
had no intention of doing this because I was happy with the tone of the amp. I decided to go ahead and do it because I had one on hand and four amps
so it would be a good opportunity for an A/B test. Certainly not a necessary mod unless you play a seven string, but may be worthwhile depending on
your playing style. See below for details.
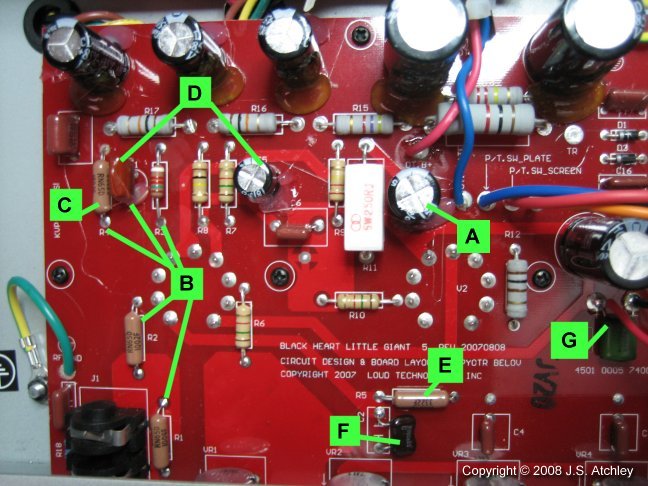 |
| Overview of Modifications 1-10 Above |
So, what was the overall result of these modifications? As mentioned above, just moving the wiring resulted in almost a 400% reduction in hum.
The amp is noticably gainier - I have to roll the volume back to about eight to get about the same degree of compression and overdrive as with the
unmodified amp. Before the modification the best crunch tone (very subjective) with both Seymour Duncan 59 pickups on my SG was with treble on five and
everything else dimed. After the modification I found myself rolling the bass back to about six or seven and the volume back to about eight for the
"best" tone.
So, you ask, what about those third-party modification kits that cost twice the price of the amp? Frankly, save your money - or use it more wisely by
buying a really good cab (I've not been excited by the clips I've heard of the Little Giant through the Blackheart 1X12 cab). I like dark amps
more than most and you can obtain very adequate bass from the amp by using a good cab and replacing five or six dollars worth of components.
That expensive "standard modification kit" includes a power transformer and a choke along with the output transformer. There is absolutely no
reason to change the power transformer unless one is also "upgrading" to the 6V6 octal tube (not part of the "standard modification"). The stock power
transformer runs warm to the touch, but less so than some of my homebuilds that I know are running well within the specs for the
transformer. I could detect no mechanical vibration or hum from the power transformers in either of my Little Giants (power transformers that are
operating near their maximum ratings often vibrate and that vibration is amplified by the chassis, causing a mechanical hum or buzz that comes from the
chassis rather than the speaker).
There is
also no reason to add a choke to even a single-ended amplifier when there is almost no ripple on the power supply – as is the case with the stock Little
Giant. The first stage filter of the high voltage supply is a very effective pi filter using two 47uf capacitors and a 1k resistor. There is almost
no ripple on the supply. Just about all of the hum present in the amp is due to the poorly routed AC primary wiring, as mentioned previously.
Unlike a class A/B amp where a 1k resistor before the plate could cause significant sag or poor bass response the resistor in the pi filter of the high
voltage supply of the Little Giant does not cause sag because the amp is a class A single-ended amp - there is very little change in the average current
draw when going from idle to even a heavily overdriven signal. You might get just slightly better
bass response using a choke - but not as much improvement as you would see from replacing the two 47uf 450VDC capacitors with 100uf 450VDC
capacitors - a much easier and far less expensive change.
The output transformer doesn't seem to even warm up from room temperature. While there isn't necessarily a direct correlation between
ample current-handling capability and avoidance of magnetic core saturation in a transformer, generally if a transformer is "overspec'd" as to
current it's a good indication it probably will be nowhere near core saturation, either.
I'm not saying you can't get more
bass with a different output transformer - just that there are other, much cheaper, ways of skinning that particular cat and it probably isn't worth the
expense and trouble of replacing the Little Giant transformer unless you need an unusually large amount of bass - such as with a seven-string guitar.
If you really feel like you must
have a better OT then contact Chris Hurley at Doberman Amps (he also runs
AX84.com, one of the best DIY amp-builders'
sites) and ask for one of the
20W SE output transformers built for him by
Heyboer. They are very good transformers, will fit the chassis though you'll have to drill four new mounting holes, and cost a fraction of the
MM "kit." But, to stress once again, the factory iron really is good enough if you're using the amp with a good cab. I have one of Chris'
Heyboer transformers on my bench right now
and I have no intention of going to the trouble to install it in one of my Little Giants (I hate drilling chassis - especially in an amp that is already
built because you really need to strip the chassis to be sure you don't get metal bits into the circuits). That transformer really is overkill,
though.
Update 5-16-2008: Well, I broke down and installed the Doberman transformer basically so I could perform an A/B
test. I have only had a few minutes to compare the two amps because my only good cab is at the church where I play. I will try to record some
proper A/B examples and post them later but for now I'll give my first impression. There was a little more difference in the bass response than I expected, but
nothing that I would characterize as a "slap upside the head" difference. The difference is most obvious when playing sixth-string power chords up
near the headstock, when doing bass runs, and when playing open chords. The difference isn't extreme, but there definitely is more "chug" on
the power chords and a more open, resonant sound on open chords with the Doberman / Heyboer OT. Is it worth the expense and trouble? I'll give
that an absolute, unreserved, "maybe." The expense is not a big deal. At this time Chris sells the Doberman transformer for about $60 and that's not a major
cost. Installing one isn't difficult but is quite time consuming because you have to strip the chassis to avoid getting metal bits where they shouldn't
be when drilling the mounting holes. If you play a lot of open chords or do a lot of "chugging" on low-end power chords I'd say it is definitely
worthwhile (though if you're not using a good sealed cab I would still spend your money on that first). On the other hand, if you spend almost all
of your time up around the ninth fret or higher you will probably notice only a slight improvement with better iron.
 |
Little Giant and Doberman/Heyboer 20-Watt SE Output Transformer
Remember, a clean bench is a sign of a sick mind... |
I find it interesting that Blackheart has already announced a 15W amp and a 100W 2-channel amp. If the build quality and pricing fall in the same
category as the 5-watt head I can see Blackheart giving "second-tier" amp companies a drubbing in the near future - and it wouldn't
surprise me to see the company poaching some sales from the "big two" as well. It remains to be seen whether Pyotr and friends can continue to deliver a
reasonable quality, modification-friendly amplifier at such a low price (even $180 is a very good deal, in my opinion - I am currently designing a 5W SE
amp that has one additional gain stage and an FX loop and the cost of materials for that home build exceeds $300 - of course, that's using top-notch
parts instead of Chinese). I suspect that Pyotr's biggest hurdle will be staving off the natural inclination of the bean-counters at Crate (the
parent company) to cut corners for another nickle profit here and there.
Some might wonder why I don't provide step-by-step detailed instructions for performing these modifications as I do for some of my guitar modifications.
Frankly, it's a lawyer thing. Unlike working on a guitar where the worst that can happen is that you mess up your axe, working on tube amps can be very
dangerous for the inexperienced. It's not just a matter of knowing the rules for working around high voltage, but having the experience to follow
the rules habitually. Basically, if you can't perform a modification using a schematic, photo, and brief description then you probably don't
have the experience needed to safely perform the modification - find someone who does!
I am investigating the possibility of either providing amp tweaking services or selling tweaked amps but haven't decided yet if I can offer the services
at a reasonable rate while making it worth my while.
|

