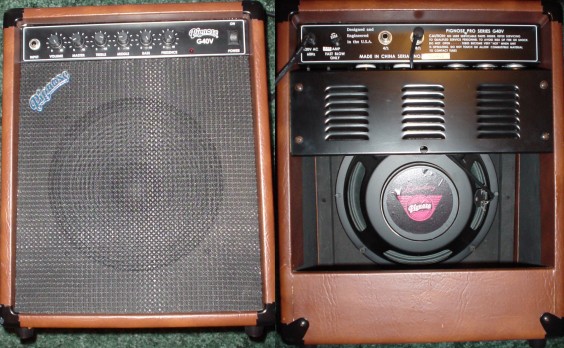
Review and Modification of the Pignose™ G40V
"All Tube" Amp
Updated 1/28/2006
|
I recently purchased a like-new used Pignose G40V amp expecting to hate it. Why would I purchase
an amp I expect to hate? The G40V is the most inexpensive all-tube amplifier I know of, especially in its
class. It is a 40W 6L6 tube amp with a master volume, full tone stack, and external speaker jacks for 8 and
4 ohm speakers. Currently, the Pignose G40V is available from online retailers for not much more than
two-hundred dollars. (Unfortunately, since I originally wrote this the price has gone up
substantially to around $320. At that price the amp is still a pretty good deal, but not the great deal it
once was.)
By-the-way, I don't know if it's true but I've heard that Pignose is discontinuing this amp, and possibly the
G60 as well. If so, it would be a real shame. As you will read below this amp is probably the best
deal going for the budget conscious buyer right now, and with only minor tweaks it sounds extremely good. If
Pignose discontinues this amp it will be kind of like the Peavey Classic 20 – another amp nobody realized
was a gem until it wasn't available. Today, it's hard to get a used Classic 20 without paying more than
they typically sold for when new! Update 23 July, 2005 - well, it looks like instead of discontinuing the amp Pignose just
raised the price significantly. That's a shame but it's still a good deal, I suppose, though not as good as it
used to be!
It's not like I really needed another amp. I've got amp projects piled all over my shop right now.
But, I'm always on the lookout for something interesting that might help y'all and I figured that this amp has
all of the right "building blocks." I decided it shouldn't be difficult to modify the Pignose G40V from
the raspy, strident amp I expected it to be into something more suitable for blues – and that such a
modification would make a good article for the GuitarNuts website. The Crate VC-508 project is interesting (and still ongoing) and produces a very nice little amp
but what about the person who really feels they need a little bigger amp and a TMB tone stack? Enter the
Pignose G40V, another economical modification candidate!
When I received
the amp I was very much pleasantly surprised. The amp sounds much better than I expected.
Oh, I'm not going to describe it as a creamy blues machine, but if your idea of good tone leans towards the "Texas"
sound as typified by Stevie Ray Vaughan and by many "boutique" builders, you might be pretty happy with the amp
just the way it comes from the factory! I guess that shouldn't be a surprise, though the amp is built in China
it was designed by Dennis Kager who is well known for his work at Ampeg and his collaboration on the Reverend Hellhound.
Even unmodified, this amp easily has the most "bang for the buck" of any current tube amp that I know of in
any power range. What I'm saying is that if I didn't know how to modify amps I could be happy, though
probably not ecstatic, with this amp as it comes from the factory.
This isn't a high-gain "crusher" amp, but it does lean more towards the hotrodded Marshall sound than it does
towards the Fender "brown" sound, in spite of using 6L6 tubes instead of EL34s. It does, however, have a nice
clean and tight bottom even when the preamp is overdriven quite hard. This is due to a preamp design that
drastically cuts the bass before the first distorted stage and then reverses that frequency response in the tone
stack, which is located after the preamp and just before the phase inverter. This works so well that I plan
on going back into the Crate VC-508 to see what I can do to cut/boost bass there to improve the bottom end at
high distortion levels.
I was also extremely pleased with some of the construction details. I was expecting phenolic tube sockets
mounted directly on PC boards as with most other modern small combos. Instead, I found real ceramic sockets and
tube shields with spring retainers on all of the preamp tubes.
Yes, the amp is built in China, and there are certainly places where they've cut corners to keep the
price down, but just finding the tubes off circuit boards and on the chassis where they belong is a modifier's
dream come true.
If there is one thing that I strongly dislike about this amp it is the appearance. With its small plain knobs,
rocker power switch, LED pilot light, and black painted front panel it looks like one of those cheesy 15W
solid state "practice amps" they sell by the millions to beginning guitarists. That might be an
advantage – if somebody breaks into your van they probably won't bother to take this amp! Of course,
I value performance over appearance any day of the week. If you're going to cut corners, as has to be done
to deliver this much amp for this price, then by all means cut them in the appearance department!
Appearance aside, there was only one operational aspect of the amp that I initially didn't care for. Initially I thought that the
tone controls had almost no effect at all. With the mid control centered, sweeping the bass and
treble controls through their entire range made almost no difference. However, once I lowered the mid control
to about 2 the other controls became much more effective. I suspect the reason the tone control
works this way is because of the changed values and the extra capacitor added to cut highs to compensate for how
the bass was cut at the front end of the preamp. Once you realize what is up it is not difficult
to work around, simply lower the mid control to about "2" and then the stack behaves pretty much as
you expect a TMB stack to work.
As mentioned earlier, this is already a very good amp for the money. It sounds great cranked
and doesn't sound bad at low volumes. If your tastes lean slightly toward
the wilder side or if you are able to use the amp cranked you might be quite happy with the amp as it comes from
the factory. But, suppose you're like me and you usually have to play at very low volumes and your idea
of good blues tone leans more towards B.B. than SRV?
My tastes are toward the smooth and warm, as opposed to the over-the-top crush that some prefer. I'm one of those
heretical few who think Stevie Ray Vaughan's tone sucked. Oh, he was one of the greatest players who ever
lived, no doubt about that, and I listen to his albums fairly frequently, but after listening to a couple of hours
of SRV I feel like I've spent the day working in a sawmill. Let me stress again, if you like Stevie's
tone then you probably won't want to do any of my modifications to the G40V - you'll probably like the unmodified amp
better.
So, can this amp which is a great value be tamed into something more suitable for heretics like me?
Well, I certainly hope so, that's why I bought it!
 |
 |
CAUTION! Working on tube amplifiers can be extremely dangerous!
Do not attempt this project unless you have been trained to work safely with high voltages. This
project works with AC line voltages and with DC voltages approaching 400 volts - either of which is easily lethal!
Even if you do not get shocked while working on the modification, you or someone
else can be electrocuted later when simply using the amp if the modification is not performed properly. Even if no one is ever injured, an improperly
modified amplifier can cause a fire that burns down your home.
If it sounds like I'm trying to scare you it's because I am. This project is intended only for
those who are qualified to accomplish it safely. For the rest of you, the best amp in the world isn't worth
killing yourself over!
Use at your own risk!
This modification will void the manufacturer's warranty. Should you choose to perform this
modification you do so at your own risk. Neither the manufacturer of the amplifier, GuitarNuts, nor
John Atchley shall be liable for damages resulting directly or indirectly from this modification regardless
of whether or not the modification was performed completely in accordance with these notes.
If you are not certain that you understand exactly what is necessary after reading this article and the
accompanying pictures and schematic, that is a very good sign that you are not qualified to perform the
modification!
| |
|
| Note, the following plots were generated by simulations that are
reasonably accurate. However, in the real world things are never quite so cut and dried. The plots are
provided for illustrative purposes only, you shouldn't expect to see exactly the same thing on an oscilloscope measuring
a real amplifier, so don't knock yourself out trying... |
Before we start cutting circuit traces and stuffing in new parts, it's important to first analyze what this
amp does very well and why. What the amp does very well is keep a clean, tight, non-farty bottom end even as
the higher frequencies are well into distortion. Why does it do that so well? Well, the first clue is in
the first two stages of the preamp...
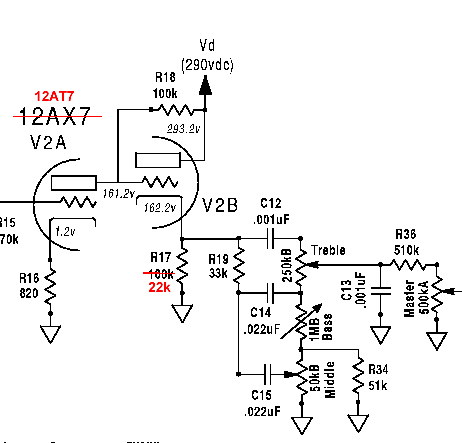
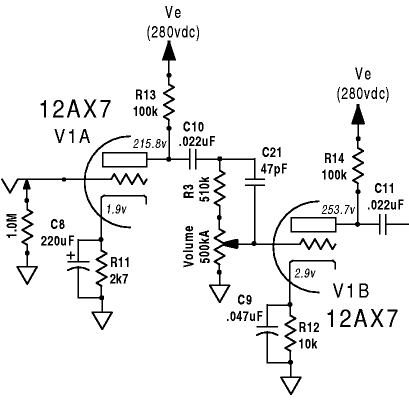 Notice the cathode circuit in that second stage. A large cathode resistor (R12) is bypassed by an unusually
small capacitor (C9). What does this mean? Well, it means several things. One important thing it
means is that this stage, if overdriven, is going to go into harsh cutoff long before it goes into smooth
saturation. So, for creamy distortion we either have to change this stage or avoid overdriving it. We'll
come back to that issue in a moment.
Notice the cathode circuit in that second stage. A large cathode resistor (R12) is bypassed by an unusually
small capacitor (C9). What does this mean? Well, it means several things. One important thing it
means is that this stage, if overdriven, is going to go into harsh cutoff long before it goes into smooth
saturation. So, for creamy distortion we either have to change this stage or avoid overdriving it. We'll
come back to that issue in a moment.
Another thing this cathode circuit will do is severely attenuate low
frequencies...
 Why would one want to do that? Well, when you overdrive at low frequencies the result is not very musical,
the tendency is for low frequencies to sound "farty" or buzz when overdriven.
Why would one want to do that? Well, when you overdrive at low frequencies the result is not very musical,
the tendency is for low frequencies to sound "farty" or buzz when overdriven.
The next step is to figure out what the amp doesn't do as well, and why, so we can tweak on the part of the
circuit that is giving problems. In this case, the amp doesn't do preamp overdrive particularly well.
It's not worse than other tube amps, mind you, and is considerably better than many, but is a little rougher than
it has to be. Since we are looking at improving the preamp distortion, we can pretty much ignore the
power amp as long as after the modification the signal amplitude out of the preamp isn't too far off that provided
by the unmodified preamp.
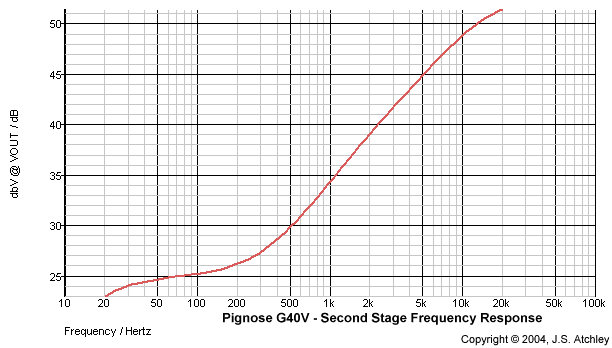
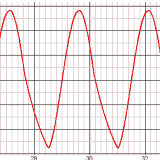
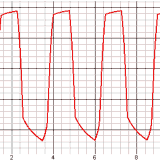
Simulating the entire preamp circuit we find that the cathode follower that drives the
tone stack is going into cutoff before any of the other tube stages. Cathode followers provide no voltage
gain but they have a lower output impedance that makes them good for driving tone stacks. However, cutoff in cathode followers is pretty
ugly, it looks something like this...
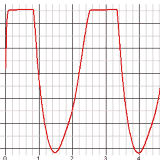
 This amp's tone stack does a pretty good job of filtering it so it looks more like this...
 ...which is why the preamp overdrive sounds better in this amp than in some that don't do as good a job of
filtering the output of the preamp. Preamps that have the tone stack before the overdriven stage, especially,
often sound quite rough compared to this amp.
...which is why the preamp overdrive sounds better in this amp than in some that don't do as good a job of
filtering the output of the preamp. Preamps that have the tone stack before the overdriven stage, especially,
often sound quite rough compared to this amp.
As the gain control is turned up (or the input signal is increased) the next stage that begins to overdrive
is the third gain stage, the
one feeding the cathode follower. Unfortunately, like almost every 12AX7 gain stage in guitar amps, this
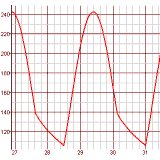
stage enters cutoff before it begins to saturate. Again, cutoff is ugly...
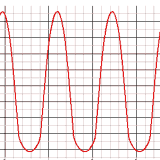
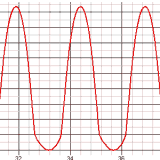
 ...while saturation is beautiful...
We could change the value of the plate and cathode resistors of the third stage to lower the plate voltage
to a little less than 1/2 the supply voltage. However, because of the high-gain of the 12AX7 we would
still have a pretty narrow range between when saturation begins and cutoff begins. Instead, we'll replace
this tube (the second preamp tube) with a 12AT7. The lower gain of the 12AT7 drops the plate voltage to the
desired level, and we are all set with a stage that will go into saturation well before it goes into cutoff.
The other half of this same tube is used in the cathode follower. Unfortunately, just changing to a 12AT7
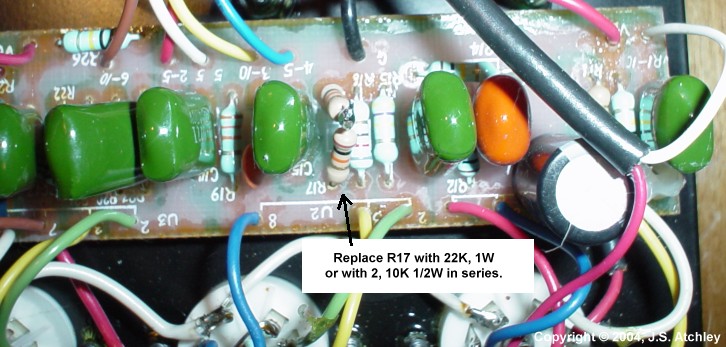
didn't stop the cathode follower from going into cutoff before the other stages, though it did delay the onset
of cutoff some. So, we'll have to change R17 from 100k to 22k to bias the cathode follower so it won't go
into cutoff as quickly. Note that this results in a substantial increase in current. The current is
well within the rating for the tube, but we do need a 1W resistor. If you don't have a 1W 22k resistor
handy, you can use 2 1/2W 10k resistors in series. NOTE: This only works because the
higher current through the other half of the 12AT7 is drawing the operating point down to around 120V instead of
160V. If you ever put a 12AX7 back in this position with the modified values the the resistors for R17
will be dissipating right at their rated power and may eventually turn a nice toasty brown and blow.
If you anticipate
changing back to 12AX7 tubes or selling the amp, use a 22k 2W or two 10k 1W resistors.
 Now we get decent saturation out of the preamp...
Pushing harder, we go into cutoff in the cathode follower (notice the slight "squish" on the left side of
the bottom of the signal)...
Now we get decent saturation out of the preamp...
Pushing harder, we go into cutoff in the cathode follower (notice the slight "squish" on the left side of
the bottom of the signal)...
 Pushing even harder, we go into cutoff in the gain stage that feeds the cathode follower (V2A)...
Of course, the tone stack filters a lot of that harshness away. The overall result is that a simple
modification (replacement of one resistor and one tube) should make the preamp a little sweeter, especially right
at the onset of overdrive. Well, let's replace that resistor and that tube and see!
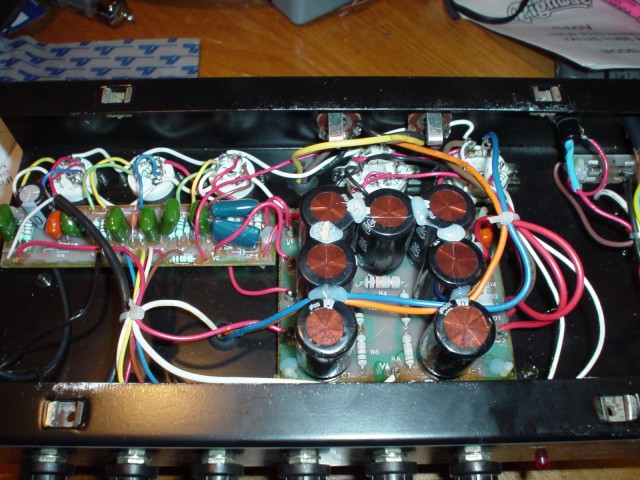
Removing the chassis was a little tricky. It's quite a tight fit and would not slide out after the four
screws that hold it to the top of the cab were removed. I had to remove the four screws from the side of
the amp and pull the speaker baffle out to get the chassis out. Inconvenient, but not difficult.
The amp has bleed resistors on the filter caps, but you should always check with a meter to make sure that the caps
have discharged before proceeding any further (and be careful when removing the amp not to get your hand inside
where there could potentially be high voltages even if the amp has been unplugged for a while).
R17, the resistor that we need to replace, is on a small strip circuit board located near the preamp tube sockets.
The board is held in place by two plastic standoffs. From outside the chassis, carefully pinch the "wings"
of the standoffs and push them through the holes in the chassis. All of the wires are soldered to the board,
on both sides, so there is very little slack to work with but if you are careful you can turn the board just
enough to desolder the resistor and solder the replacement in.
Is there anything else we can do? What about the first two stages of the preamp? Well, the second
stage is dedicated to the steep high-pass filter that gives us such great bottom, so we can't really replace that
cathode resistor. We can't replace the first tube with a 12AT7 as we'll lose too much gain and won't be
able to push the power amp into saturation when we want to run with the master volume wide open. Using a
12AT7 wouldn't help that stage anyway, it's going to be go into cutoff no matter what with that 10k cathode
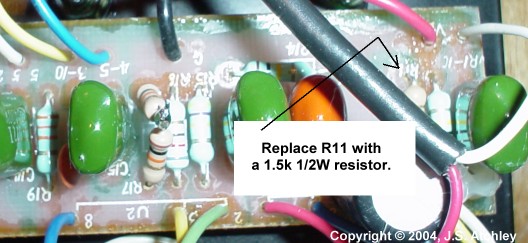
resistor. What if we wanted to use an overdrive pedal? Yes, then we could rebias the first stage
by replacing R11 with a 1.5k resistor and replacing V1 with a 12AT7. Since changing R11 to a 1.5k resistor
isn't a bad idea even with the 12AX7 tube, let's go ahead and do that while the amp is open. Then we'll be ready
if we ever decide to replace V1 with a 12AT7 and use an overdrive pedal...
 I wish I'd thought to add a resistor between the input jack and the grid of the first gain stage as well.
That's always a good idea to reduce the chances of the amp becoming a radio reciever and it also helps keep
the saturation nice and smooth when overdriving the first gain stage with a pedal having a low output impedance.
Oh, well, I'm sure I'll be back inside the amp to fiddle some more another day, especially since there is a good
chance that hum at high gain can be reduced some by attending to the wiring. For example, none of the AC
carrying wires are twisted...
I wish I'd thought to add a resistor between the input jack and the grid of the first gain stage as well.
That's always a good idea to reduce the chances of the amp becoming a radio reciever and it also helps keep
the saturation nice and smooth when overdriving the first gain stage with a pedal having a low output impedance.
Oh, well, I'm sure I'll be back inside the amp to fiddle some more another day, especially since there is a good
chance that hum at high gain can be reduced some by attending to the wiring. For example, none of the AC
carrying wires are twisted...
In summary, the Pignose G40V certainly isn't a hand-wired "boutique" amp but at a bit over $200 it is a very good bang for the buck.
Even unmodified it's a good performer, if a little noisy with both gain and volume cranked up.
If you're handy with a soldering iron and
hand tools, and qualified to work on high-voltage circuits safely, you can turn it into a nice blues amp for
the cost of a 1W resistor and a 12AT7 tube. The modified amp will still do the "Texas thang" fairly well,
though the gain is reduced a bit and you'll want to use an overdrive pedal if you want to push it really hard.
It looks a little cheesy, but folks will stop smirking when you
strike your first chord or run your first riff. I plan on visiting a friend in Missouri in a couple of weeks.
I plan to bring the modified amp along and I can't wait to hear it through his 4X12 loaded with Vintage 30's...
In the future I'm going to try putting a parallel effects loop into the amp. The levels are about right
for a line-level (about 2V) loop in parallel with the volume control. The only problem I foresee is that the eq may
be a bit bright at this point if a low impedance line out is provided, so I may have to devise a SS buffer for
the line out.
Another thing this amp cries out for is better ventilation. While it's true that the tubes are outside
of the chassis where they belong they are inverted and a lot of heat is going to travel up through the holes in the
center of the sockets into the interior of the chassis where it will accumulate. Over time that's hard on
the components inside the chassis. As soon as I can find a small grill like you see on the top of some VOX
amps I'm going to cut a large square hole in the top of the cab, right over the tube sockets, and cover it with
a grill. That should substantially improve the long-term stability of the amp.
I ended up doing more than just ventilating the cabinet. A while back I pulled the chassis out of the cabinet
and built a small head cab for it. I flipped the chassis over, flipped the power switch over, and painted the front
panel with "hammered finish" gloss black paint. I haven't had a face plate made and probably won't bother - I know
what the knobs do! I'd show pictures but honestly the cab looks kind of cheezy - a carpenter I'm not!
I'm lending the amp to a friend of mine while I repair his Classic 20 and while he's got it another friend is going to build a decent
head cab for it to match the 1 X 12 closed back cab he just built me.
I also replaced the 6L6 Chinese power tubes with JJ 6V6 tubes some time back. I wouldn't recommend doing this with any other 6V6
tubes because B+ is well over 400 volts which is way above maximum for 6V6 tubes. However, the 6V6 tubes from JJ have
been tested in various amps at 500 volts without any problems, so I ordered a pair from Bob at Eurotubes a while back.
They sounded pretty good just being dropped in but it was pretty obvious they were biased cold. At high
volumes there was some really gnarly growling crossover distortion - it actually sounded pretty cool as an effect but not
something you'd want to hear all the time. Today I finally
got off my keester and biased the amp properly. I ended up changing the 56k R2 for a 33k and 15k in series (48k
total), which took the bias from a little less than 50% of max plate dissipation to about 83% of max. This was a little
hotter than I wanted but I didn't want to order a bunch of precision resistors. It sounds
quite good now and of course the crossover growl is gone. It's now running 420 volts on the plate, 27.5ma of plate
current (11.6W dissipation) with about 0.8ma of screen current at 411 volts (about 1/3W, well below the 2.2W max).
I'm also running a JJ ECC83S in V1 and JJ ECC81 (12AT7) tubes in V2 and V3. Over all the amp has much better bottom
end than it did with the 6L6s and Chinese preamp tubes. My old surplus scope has been calibrated in decades so I can't say how much power the amp is putting out but it should be
in the neighborhood of 15 to 20 watts - about half what it was rated at with 6L6 tubes.
It sounds quite good now - though it's still noisier than many amps. Next week I am visiting a friend in MO and we are going to record some sound clips
with the amp through my new 1 X 12 closed back cab with a 12" Weber Silver Bell Alnico, his 1 X 12 closed back cab with an older Vintage 30,
and his Dual Rectifier with a pair of older Vintage 30 speakers. So, watch this space for some sound clips a couple
of weeks from now.
|


